
Although Lucas has been said by some to be the "Prince Of Darkness", the rocker switches produced by that company for everything from headlights to heaters to hazard lights and everything in between are actually generally well made and best of all easily serviced by the average mechanic. The modern replacements are not made the same way, and in general are inferior in design, fit, and finish. Lets take a look at the headlamp switch.
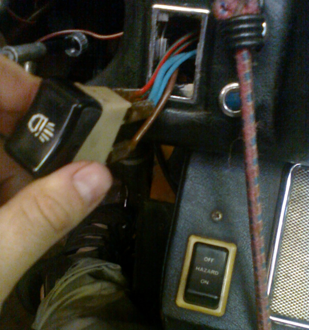
At first, removing switches from the dash may seem like a challenging ordeal. Haynes manuals do not say one word on the subject, and the parts manuals do little to help you visualize just how they are held in place. In fact the switch itself is held in place by a chromed plastic bezel. It simply snaps into place. This bezel in turn is held in place by a wire clip. The wire clip cannot be removed until the switch is removed from the bezel.
All you have to do is gently press down on the top and bottom of the switch with something hard like a screwdriver, while pushing it out. You can even do the top first and then the bottom or vice versa. The only difficult thing about this is that there is limited space behind the switch (its packed with wires, gages brackets etc). I wont say its easy, but I will say it could be worse.

Once its out, its important to note just exactly how the wires connect to the switch. On the back there are four terminals. The top of the switch has some red/green wires connecting to it that go to the side marker lights, and some blue wires that go to the headlights, parking lights, and tail lights. The bottom two terminals are internally connected to each other so it doesn't matter which of these connects to the brown wire (which is unswitched power from the positive battery terminal).
The switch itself comes apart easily. The black rocker simply snaps onto the base. To remove it just gently squeeze on the sides of the switch and lift it off its base. Be careful not to lose the any parts. In all there are 5 parts, the rocker, the base, a coil spring, a ball bearing, and an internal rocker.
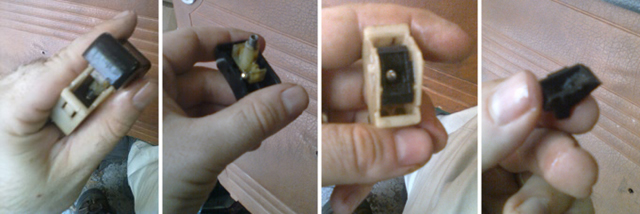
Essentially it works by pressing one or both copper tongs against their contacts on the inside. Sometimes these can get a bit corroded so just squirt the inside with some aerosol contact cleaner. In the USA you can get this at any radio shack. Its also useful for many other things so its well worth having in your arsenal. One other thing that can go wrong is that the internal rocker can wear against the copper tongs and not depress them far enough. On mine it looked like it wore enough that it heated up the copper enough to slightly melt the plastic internal rocker. To remedy this I bent the copper tongs slightly with a screwdriver. Another way these can fail is the contacts themselves which are simply rivets that hold the terminals on as well as make the electrical connection. This can be caused by plastic melting enough to loosen them. I haven't yet seen one that was loosened by vibration or mechanical wear and tear. If a terminal is loose there really isn't anything that can be done to save it. Otherwise just do what you can to clean the unit and if you like you can lubricate it with electrical contact grease. I also recommend tightening the female spade terminals very carefully with a pair of pliers and cleaning the contacts with the contact cleaner. These can and do corrode over time.
~ Seth