This article was taken from the February 1962 Issue of Car and Driver
 • Being quite literally the heart of any engine, the fuel pump requires periodic attention and should be one of the first items considered at tune-up time. The electric fuel pump is considered to be the most efficient type for a high-performing engine. It works independently of engine speed and can eliminate hard starting, vapor lock, fuel starvation or flooding.
Most of the popular sports cars are equipped with an S.U. or Hardi pump of the pulsating-diaphragm, positive-displacement type. When the pump is at rest, the points are in contact. As soon as the ignition key is turned "ON" , current passes through the points energizing the magnet which attracts the armature and the diaphragm with it, thus sucking fuel from the tank through the suction valve into the pumping chamber. When the armature is nearly at the end of its stroke, it diaphragm with it," thus suck ing fuel from the tank through the suction valve into the pumping chamber.
When the armature is nearly at the end of its stroke, it trips a " throw- over " mechanism, separating the points and breaking the circuit. The armature spring then pushes the armature and diaphragm back, forcing fuel through the delivery valve to the carburetor. As soon as the armature gets near the end of this stroke, the throwover mechanism again operates, the points again make contact, and the cycle is repeated until the float bowl is full enough for the float to lift the needle valve closed against its seat . This means that the pump automatically fills the carburetor as soon as the ignition key is turned ON-thus the burst of ticking you hear-and the pump operates at a rate determined directly by the engine's fuel requirements.
With the ignition key turned on and with adequate fuel in the tank , should the pump cease to function, first strike the magnet housing gently with a screwdriver handle or similar light object . If it then operates, the trouble was likely due to sticky points or possibly a poorly tightened electrical connection . (Check also at the battery terminals.) If the pump still fail s to operate, disconnect the delivery line to the carburetor.
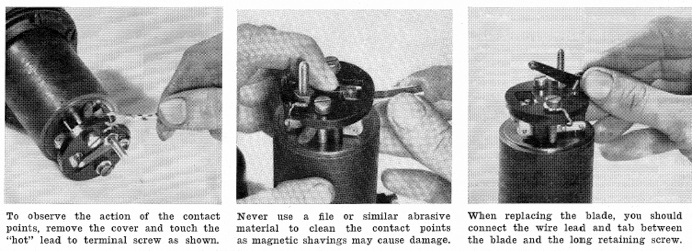
If the pump works now, the likely cause of the trouble is a sticky needle-valve in the carburetor float chamber. Should the pump still fail to operate, however, disconnect the terminal lead and strike it against the magnet housing to see if it sparks and, therefore, if there is current. If current is there, remove the bakelite cover and touch the terminal with the same lead when the points are in contact-then if the ' pump fails to operate, it may be due to dirty or burnt contact points. Dirt may be cleaned off by inserting a piece of match-book cover between the points, pinching them together and sliding the card to and fro. If the points are burnt or badly pitted replace them.
If the pump still fails to work with clean points, it is possible that the filter at the fuel intake is clogged. A choked filter or an obstruction in the line on the suction side will make the pump struggle to operate, become very hot , and eventually cause a failure. The filter is readily removed by unscrewing its retaining plug and washer at the bottom of the pump.
If that's not it, slacken the inlet line union, and if the pump then operates freely, the trouble is probably due to an obstruction in the line from the fuel tank which can be cured by blowing through the line with a tire pump or a good pair of lungs.
On the other hand, if the pump keeps beating with out delivering any fuel despite a full fuel tank, it is possible that a piece of dirt has lodged under one of the valves or an air leak has occurred on the side towards the tank. The valves can be removed for cleaning by unscrewing the top union and lifting the valve cage out. When replacing, see that the thin hard fibre washer is below the valve cage and the thick one above. The simplest way to check for an air leak on the suction side is to disconnect the delivery line from the carburetor and allow the pump to pump fuel into a glass bottle, and if some bubbles come through, there must be an air leak, either in the fuel feed line-which is between the fuel tank and pump-or at its unions or joints.
If none of the remedies mentioned cures the pump's malfunction, the trouble is probably due to a fault in the pump itself-such as a stiff or ruptured diaphragm or foreign matter in the roller assembly which supports the diaphragm. In this case the pump should be returned to the nearest dealer for an exchange or overhaul.
Replacing the contact point assembly correctly in the British S.U. or the German Hardi electric fuel pump is done simply by a method called "count the turns ." This is the most popular method employed by mechanics and proves successful in 95 out of 100 cases where the pump's malfunction has been traced to bad points. Remove the bakelite cover and unscrew the contact blade retaining screw. Remove the blade and wire lead. Remove the two long pedestal screws and locking springs. Gently, using a slight twisting action with a pair of needle -nose pliers, pull out the rocker assembly hinge pin. Caution should be used in this step for the bakelite platform is quite brittle. Unscrew the terminal nut and cut away the lead washer squeezed onto the terminal threads below the nut, and push the terminal down a short way so that the tag on the coil lead is freed from the terminal. Take care not to damage the coil lead when disengaging.
At this point -we will use our "count the turns" method Unscrew the rocker assembly from the bronze shaft at the trunnion . Important: count the number of turns it takes to free the rocker assembly from the shaft (usually 5% to 7 turns ). Then screw the new rocker assembly onto the bronze shaft at the trunnion the same number of turns it took to remove the old assembly . In a majority of cases, this method will give the same armature and diaphragm assembly adjustment as the original, and if not, it will be so close that it will not interfere with the action of the pump. Replace the rocker assembly onto the pedestal
When replacing the contact blade, put it under the tag, flush with the bakelite pedestal. When the points are separated, the blade should rest against the ledge of the pedestal and the points should make contact when the rocker throw-over assembly is in the midway position.
To check for proper point gap, hold the blade in contact with the pedestal with your finger without pressing on the overhanging portion, and test the gap between the rollers of the rocker assembly and the pump body with a .03 0-inch gauge. With the gauge in place, the points should just make contact, and if not, gently bend the blade so that they do . With the gauge removed, the points will be spaced at the proper gap . Many of the SU pumps are equipped with a single contact point set which can be replaced with a dual point set without any modification for longer point life and increased efficiency.
Almost all imports are equipped with one of the many models of the S.U. or Hardi electric fuel pump whose actions are similar; thus general maintenance is the same. The newer Hardi pumps are equipped with adjustable contact points and leave very little to be desired in the way of electric fuel pumps.