
The following was submitted by Brian Morse owensdad74@gmail.com. This is by no means the definitive method, but it works well and seems to follow recommendations found in the latest Haynes manual. The engine does not need to be removed with the gearbox attached, but some find it easier (depending on circumstance). Thanks Also to Jim Dougherty of New Orleans Louisiana for testing this method and providing input.
Preface
I have a desmogged 1979 MG Midget I purchased this past spring. It has had a smoking issue since I bought it, and I tried all the easier, noninvasive fixes such as Sea Foam additive, Marvel Oil additive, timing, retiming and retiming again. All despite a compression test that showed that cylinder one was gone, and cylinder two was not much better.
To further investigate the issue I decided to remove the cylinder head. I did the following to accomplish this:
- Drained engine coolant from block and radiator
- Removed cooling fan and pump
- Removed intake manifold and carburettor
- Removed exhaust manifold
- Removed the cylinder head.
Following are images of some of the findings:
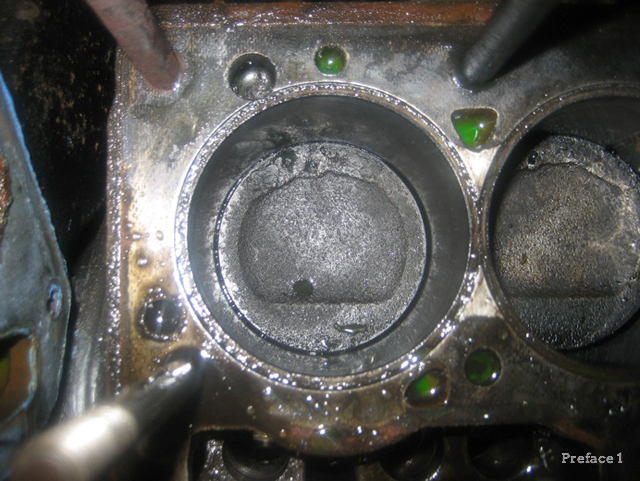
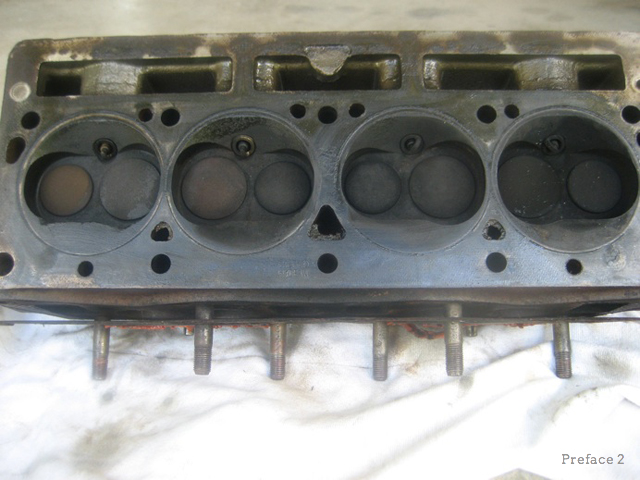
Image Preface 1 shows obvious damage to the crowns on pistons one and two. Feeling the cylinder liners revealed scratches in both, and apparent uneven wear. Image Preface 2 revealed a fouled, but seemingly intact cylinder head and valves. Based on these findings it was apparent the block needed to come out for machine work. So to get ready to remove the engine, I focused on draining the remaining fluids, disconnecting wiring, radiator removal, clutch slave removal and gearshift lever removal.
If you know you will remove the engine before you look into it, don't remove the water pump, head or exhaust manifold first. This will allow you to utilize the alternator bracket as a hoist point. Also it will keep dangling parts out of your way when you go to drain the engine fluids. Following are the items I addressed in no specific order. Just a quick note too- if your engine is not desmogged, the process remains the same. You will merely have more components to label and remove.
Tools to get the Job Done
I will employ a chain lift (fixed in place), four axle stands, hydraulic floor jack, and load leveler. As you assemble these items, keep in mind you need to be able to lift 350 pounds safely, as that is the combined weight of the engine and transmission. Also, be sure to have plenty of plastic storage bags and a Sharpie on hand. As soon as you take things off, put them in the bag and write where they belong!
Top End Preparation
Distributor
Label your spark plug wires, remove the distributor cap and set aside so the wires don't hang up on anything.
Fuel Lines
Remove the fuel lines at the fuel pump and place them aside. Remember to cap the line from the tank with a bolt and hose clamp.
Disconnect Wiring
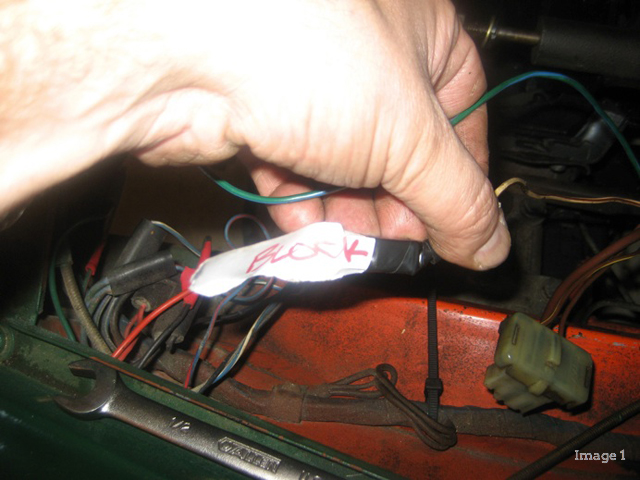
My labeling method was writing on a scrap of paper the wire destination and using electrical tape to attach it to the wires. The lead to the thermostat housing was already removed and labeled "TSTAT". I removed the lead to the block sensor and labeled it "BLOCK" (Image 1).
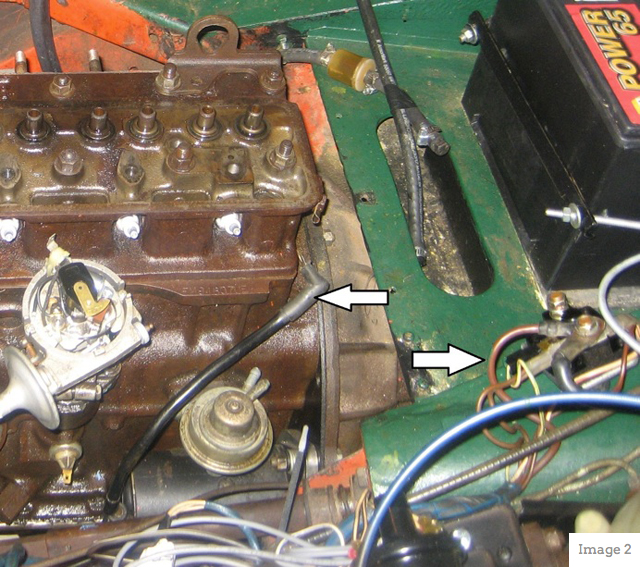
Next I removed the starter cable from the voltage regulator, then leaving all other wires attached to the regulator, dismounted it and pushed it aside (Image 2).
Image 2
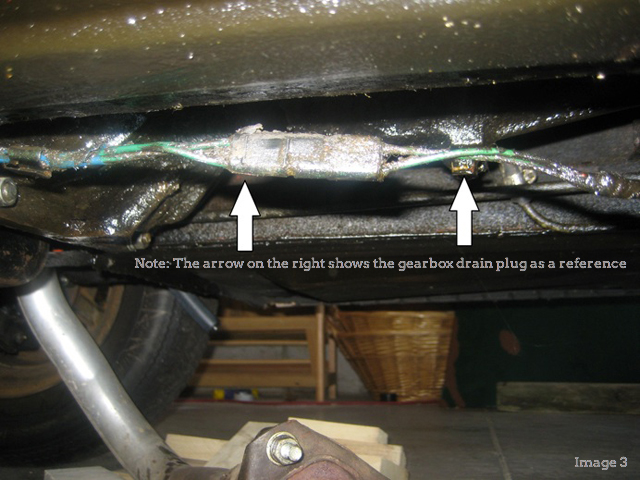
Next there will be three green wires in harness that sneak under the starter and into the transmission tunnel (Image 3). Crawl under the car and unplug and label these. Pull them up and out of the engine compartment so they won't snag on anything.
Fluids
As stated before I already removed my water pump, so those connections to the radiator were already undone and the radiator was drained (mostly). I removed the two bottom radiator mounting bolts, then the two top bolts and it came out very easily (Image 4).

This image doesn't show it, but I also pulled out the purge tank from it's holder so it doesn't suffer any accidental damage from the engine removal. Then I took a few minutes to run water through the radiator to clean it out. I will look into getting some metal preserving fluid to slosh through the radiator to protect it through winter. Next came draining the remaining coolant from the block. I placed a plastic dish pan under the engine then undid the brass drain plug (Image 5).

Next drain the gearbox oil. This step is also very simple. Crawl under the car, locate the drain plug with the square head (Image 6), place your catch basin underneath it and undo the plug.

Remove Clutch Slave Cylinder
If you look into the transmission tunnel over the top of the fuel pump you will see the clutch slave cylinder. There are three bolts holding it on. Two of the bolts hold the cylinder to the clutch housing, a third pinches a cylinder on the slave to hold it in place (Image 7). Some repair manuals recommend removing the hydraulic line, but a great tip from the Midget forum recommended removing the cylinder intact from the pinch holder so you don't have to bleed the clutch after you remount the engine and transmission.

Remove Gearshift Lever
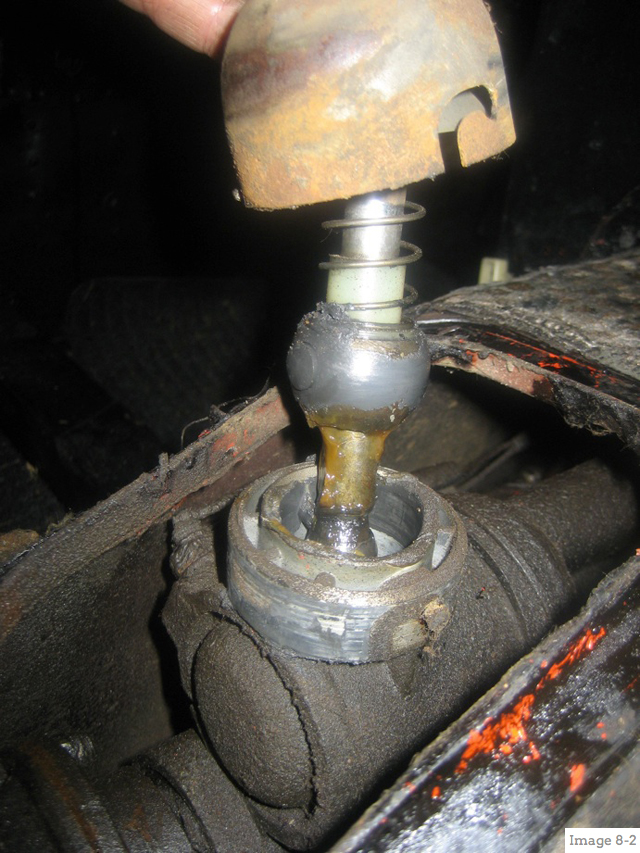
This also is very simple. Remove the screws that hold the metal boot ring in place on the hump, then remove the metal ring. Gently pull the boot up and away from the hump. I needed to remove the PO's carpet job in-between here; you may or may not need to do this. Unscrew the gearshift knob and pull the boot off the lever. Now you should be looking at a dome-shaped collar that holds the shift lever in place (Image 8-1). The collar is slotted on either side, so to remove you push down on the collar, turn it counterclockwise and it should release. The lever then lifts straight out of the assembly (Image 8-2).

Conclusion
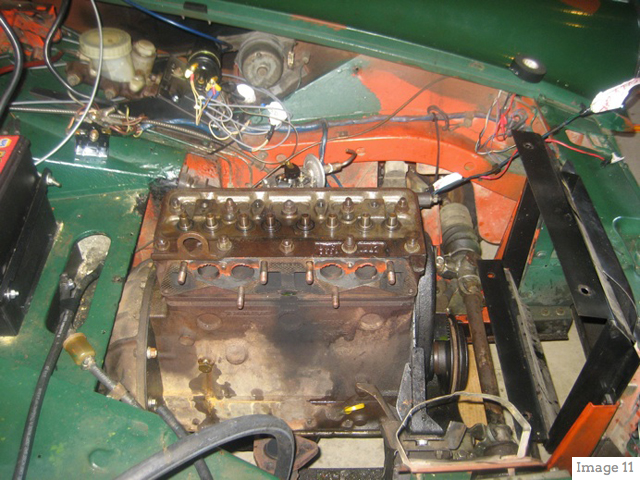
As a last step I remounted the cylinder head. As stated before I plan to use the load leveler I got from Harbor Freight which has four right angle brackts that can be attached to the cyllinder head. I was concerned about connecting them to the head bolts without the head as this may potentinally bend the head bolts in some way. I tightened the head bolts, not torquing them, so they were good and snug. The final three images (9, 10, 11) show my engine bay prepped for engine removal.


Under-car Engine Removal Preparation
Now that the topside of the engine is ready for removal, it is time to jack up the front and the rear of the car, place axle stands as appropriate and complete the following tasks. Unlike the top-side section of this paper, this section is order specific.
Remove Oil Pan
In order to gain more clearance when removing the engine, remove the oil pan and set it aside. While removing the engine, be very mindful of the protruding oil strainer so as not to crush it.
Disconnect the Transmission Restraint
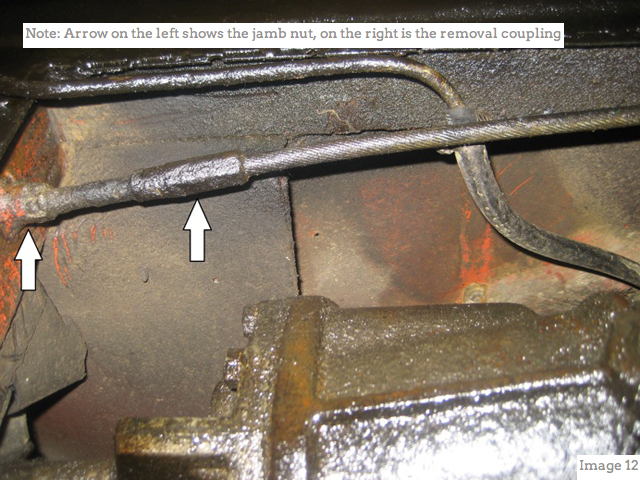
The transmission restraint is simply a cable that connects the clutch housing to the body of the car. To disconnect the cable, loosen the nut closest to the body of the car. This is simply a jamb nut. Then remove the cable by moving your wrench to the second position in the image to back the threads out of the hole (Image 12).
Disconnect the Speedometer Cable
While under the car disconnecting the restraint cable, you can also remove the speedometer cable. Simply remove the retaining bolt and remove the cable. There are no intricate parts that will come out once it is loosened and removed (Image 13). Again, the image is taken from under the car. The lower arrow shows the already disconnected clutch slave cylinder.

Disconnect the Transmission from the Driveshaft
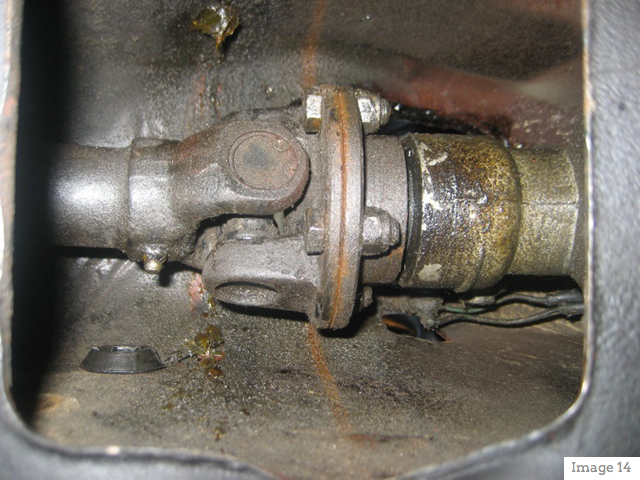
To disconnect the transmission from the driveshaft you will need two 9/16 open end wrenches to remove the four necessary bolts. The connection is accessible through the opening in the transmission tunnel from underneath the car (Image 14). As you remove the bolts connecting the driveshaft from the transmission, the driveshaft will want to fall down on you. I took a piece of wood and shoved it between the driveshaft and the floor pan at the rear differential end of the sheet metal. This helped steady the driveshaft while I removed the last bolt between the two.
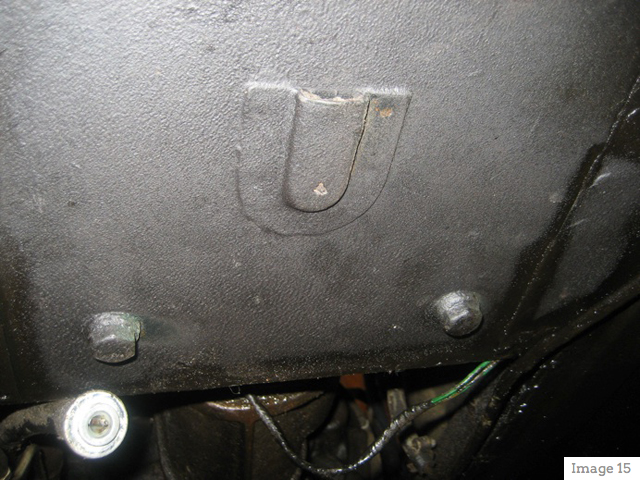
Remove the Undercar Transmission Mounting Bolts
This is an easy step. From underneath the car you will see two bolt heads protruding from the sheet metal. These are just fore of the opening where you disconnected the driveshaft
(Image 15).
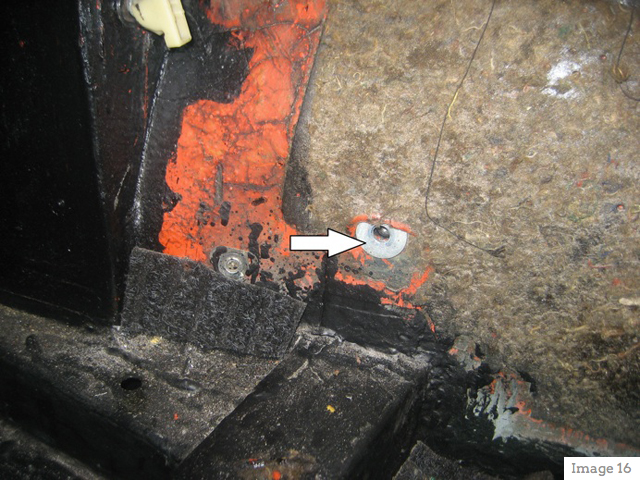
Remove the Cabin Mounting Bolts
In the passenger cabin, on the transmission hump there are two bolts on either side. Remove these two bolts (Image 16).
Take the Car of The Axle Stands
Before attaching your hoist arrangement, be sure to remove your axle stands and put the tires back on the ground.
Attach and Apply Tension to the Hoist
At this point the transmission should be free from restraint, so the last two points of connection are the front engine mounts. This is the time to attach your hoisting mechanism to hold tension on the engine while the last two mounts are undone. The included image is how I did this (Image 17).
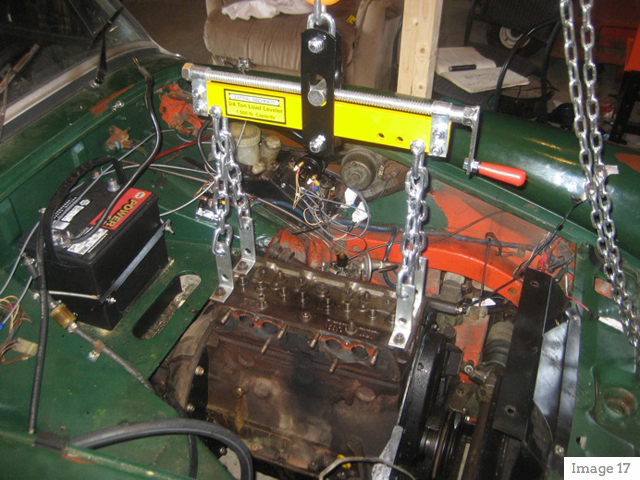
Apply Tension to the Hoist and Take loose Engine Mounts
Lift your hoist until you feel some tension applied on the chains. Once there is enough tension on the chains to support the engine, take loose the front two engine mounts. Once the engine mounts are removed it is a game of feel to get the engine out.
Remove Engine from Car
In my experience removing the engine is a game of feel. The first step is getting the driveshaft flange to clear the body crossmember. The transmission needs to be raised slightly and brought forward until the flange is clear. Once that flange is below the crossmember it becomes a game of up and down on the hoist, changing the angle with the load leveler and moving the car back and forth. Again, with the oil pan removed be careful not to damage the protruding oil sump. With the oil pan and radiator removed, this process should be pretty easy. A quick note here: I didn't have to jack up the front or the rear of the car to remove the engine. I simply rolled it back and forth as was needed. Just as a reference image 18 shows the ultimate angle at which the engine must be removed.

Conclusion
Overall, this process was one of the few that went just as planned from the research I had done before starting. As always, I am thankful to all the forum members who respond to my threads, regardless of how banal they may be. In this case though, I would like to offer special thanks to the forum members who helped me complete this project successfully:
Charles Linn
Dan Conwell
Jeff and Brittany Brackenridge
Prop
Pat Klaas
Conrad Griffith
Norm Kerr
Robert Kirk
Ron Arnold
Michael Anderson
If I missed anyone I apologize and please let me know so I can add you to the list!