
The following is a method of improving the oil seal on the rear of the engine. A PCV valve is not as essential as Paul asserts since not all 1275 models had them. However a positive crankcase ventilation system is essential. Personally, I think there are better methods of improving the seal like the moss kit and the kit available from Gerards Garage. Most of the time a proper engine rebuild with a functioning positive crankcase ventillation system is enough to prevent leakage. However if you're strapped for cash and willing to accept possible irreversability then by all means give this a shot. You can download the original as a PDF
An Overview:
On the British A Series engines, and some others, there is no positive crankshaft seal on the rear main bearing. Oil leakage is prevented by a close fit between the crankshaft and the main bearing cap and a matching piece butting against it, this will be called the crescent, held to the block with three 1/4 inch cap screws. They're sometimes wired together.
There are spiral grooves on the crankshaft in this area that are supposed to pull surplus oil into the crankcase. In it's factory design mode it works at best only "so so", resulting in oil loss around the rear main that drips or streams down between the engine backing plate and the transmission housing. The reason being that the clearances between the crank and it's two seal pieces are too great because of poor initial fit or wear making clearances so large that the crank grooves can't draw the oil inward. This wear is normal as the engine bearings wear and or the crankshaft flexes at high engine RPM. But once clearances are opened up there is no easy way but this method to close them. Positive crankcase pressure also works against it, so you must have a crankcase ventilation system in operation. It can be passive or active, active preferred, (smog valve) but it must be in operation.
This seal can never be brought back to tolerance by machining but it can be closed up beautifully by this casting method that is easily within the capabilities of an experienced DIY person or mechanic.
What follows is a detailed illustrated description of a procedure that will close up the clearance to better than new. This is best done when you rebuild the engine but can be done effectively at other times, provided you have correct engine bearing clearances. This is easily determined with the Plasti-Gage.
The Routine:
The procedure will be described as though you are doing an engine rebuild.
Set up your crankshaft in the block with your new bearings and thrust washers. Check for proper oil clearance using Plasti Gage, and the correct torque of 60 lb/ft. All threads, bolt shoulders, and tapped holes should be well oiled. Bearing clearance range should be .001" to .0025". Less or more than these amounts, take your crank back to the shop for resizing. If all three mains are correct for clearance, refit main caps 1 & 2, torquing to the right specs. Leave off cap 3 and the crescent.
You may need to shorten the bolts that hold the crescent to the block. Try this: Place all three bolts into the crescent and try to slip this assembly up into position against the block. If the bolts are too long, it won't go up into place. Either shorten the bolts or replace them with slightly shorter ones that will fit between the block and the crank flywheel flange. When this assembly will fit up with ease in this space, take it off and go on to the next step.
Clean the part of the crank that has the spiral grooves on it with a solvent cleaner such as alcohol. You don't want any oil on the smooth portions or the grooves. Cover the bearing surface with a rag as shown and spray a couple of Dry Graphite spray on the part of the crank as illustrated in photo 1. Rotate the crank to spray all around evenly. Leave the crank with #4 rod journal in the half way up or parallel position. Form now on, DON'T ROTATE THE CRANK, VERY IMPORTANT, PAY ATTENTION TO THIS, DON'T EVEN NUDGE IT.

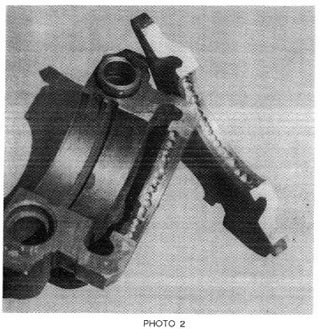
Remove the bearing shell from the rear cap. Take the rear main cap and crescent and drill a series of interconnected 1/8" holes. All holes should run into each other on their sides. Don't try for neatness, just get them somewhat like photo 2. About 3/16" or so deep is fine. If you drill too deep and go clear thru some on some holes, no big deal. Don't drill all holes thru though.
Prepare two pieces of cellophane. The source of this should be from a cigarette package. Cut from a flat panel and make them about 1 inch by about 7/16 inch. Seth them aside in a clean place for now. OK OK, so you don't smoke. Get it from someone who does. I like this cellophane because its quite thin and fairly ridgid. It's only about 1 1/2 thousand so it takes up little space for this application.
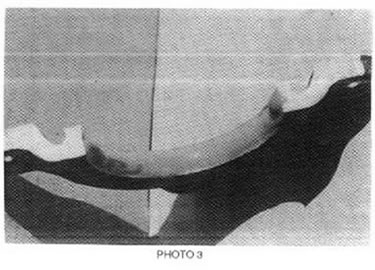
Now mix up some JB Weld. A procedure like this works nicely. Squeeze out about an inch and a half from each tube onto a small pad of scratch paper. Use a 6 or 8 penny nail as your mixing stick. Mix thoroughly. Get the crescent gasket and three modified bolts ready. Pick up the crescent and using the nail as a pickup stick, pick up small amounts of the JB Weld mix and stuff it into the holes in the crescent, starting on one side, and working your way to the other end. Poke into all holes with the point of the nail so there are no air pockets or voids. When you're finished, it should be slightly mounded as in photo 3. Now carefully put three bolts and the gasket on it and place it on the block, flush against it, and push it up against the crank. Don't push up too tight. The surface of the crescent should be even with the surface of the block, not above it. Check with a small straight edge if need be. Make sure the gasket is all the way up so there is no gap between the two pieces. If it's too high, OK. You can fix that in a minute. Now tighten up all three bolts. Should only be 6 lb/ft. If the gasket was too high, shave it off with a sharp razor blade.
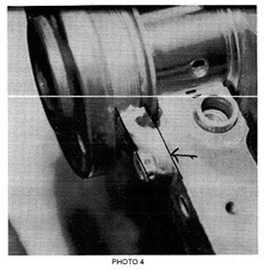
Those cellophane pieces should now be placed on the top edge of the crescent with one edge into the JB Weld and close to the crankshaft surface. See detail line in photo 4.
The long edge should be close to the block but not overlapping it. Do this to both sides of the crescent. This is used as a parting line after the JB Weld has cured. Without it, a break in the JB Weld may occur in a place you don't want.
Pack the drill holes in the main cap now just as you did the crescent. When that's done, wipe the shell area and the back of the bearing shell and fit the bearing shell into the cap. Oil lightly and fit this over the crank and torque properly. If you've put the right amount of JB Weld on each of the pieces, it will now have a small lip of it showing on the crank surface. If not, don't worry, it will still work right.
Cover the block with a rag and let it set a minimum of about 24 hours. If this is being done in a cool area, 50 degrees or so, it may take two days to cure.
 |
 |
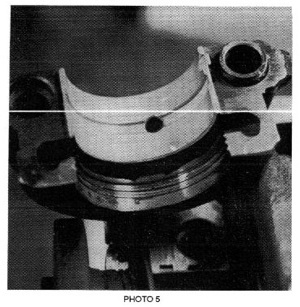
Now after it has cured it's ready for the next phase. Unbolt the rear main cap from the block. With the bolts removed, tap lightly with a small soft hammer on the side while prying gently with a screwdriver under the pry tabs. Try to raise it evenly instead of lifting one side to the max. It should come up with no problem if you used the correct Moly spray. Remove the bearing shell for safe keeping. Now with it off you will see that there are ridges cast in the seal area. (See photo 5) Remove the cellophane pieces from either the cap or the crescent. They may stick to one or the other. Discard them. To remove the crescent, with the three bolts, backed out, tap each corner lightly with a soft hammer to drive it away from the crank. Do this gently and keep it from dropping to the floor or work bench. Remove the three bolts and gasket and set them aside. DO NOT, I REPEAT, DO NOT ROTATE THE CRANKSHAFT IN THE LEAST,
You have now cast an exact reproduction of the crankshaft with the JB weld. The flat areas between the ridges are going to be the new sealing area around the crankshaft. First the ridges will have to be removed. This is going to be a test of your eyesight and the steadiness of your hands.
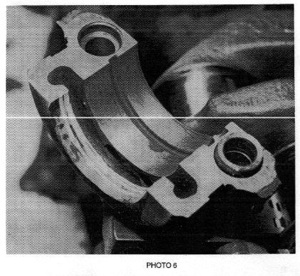
Use eye protection and a breathing mask while doing the following. Set up your Dremel tool with a grinding disc on a mandrel and under good strong light and a comfortable work area begin to gently grind off the ridges. JB Weld is pretty dusty as you grind it and smells pretty bad too. As you grind down thru the ridges, try to keep from grinding any of the flat area thats now the new seal area. Don't grind the ridges to a level below the sealing surface. If you grind it off to about 95% done, that's good enough. Later you'll get the last 5% or so in another step. Trim just enough off the outside edge of the JB Weld so it won't have a razor edge to it. There will likely be a rounded area on the side close to the oil drain groove. Trim that all the way back to the metal. When you're finished it should look something like the cap in photo 6. Do the same routine to the crescent.
This is a steady handed job and if you have trouble with it, get one of your kids or your grandchildren to do it for you. They have amazing eyesight and abilities when asked to do something special. Especially something you're having troubles with.
Now comes another reassembly. Next to the last though. The reason for not rotating the crankshaft will now be apparent. You need to put the crescent back on the block. Use the gasket and the lockwashers now because this should be the last time it's put in place. Now remember that you likely left just tiny amounts of the ridges so they must fit exactly into the grooves in the crankshaft that they came out of. If you rotated the crank, the crescent won't fit back up into place, because the grooves in the crank are in a different location. Remember, they're in a spiral pattern so as you rotate the crank these grooves will move forward or back, changing their position in relation to the cars pieces.
Fit the bearing shell back in the cap and torque it down again.
The tiny amounts of irregularities that you left on the ridges can ow be removed. This process will only remove small amounts so don't force too much. Try now to rotate the crank one way or the other by hand. When it sticks one way, go the other. Do this back and forth 6 or 8 times and the grooves will be shearing away the small amounts of the ridges you left. If you left a lot of them, this back and forth won't work. Disassemble and regrind again. However it works well to remove small amounts. When the crankshaft will rotate all the way around, this is done. It will likely be rather stiff too, but should turn by hand OK.
Take off the main cap and remove the threads of JB Weld left in the spiral grooves. Rotate the crank 360 degrees or more to get them all out. Oil the seal areas on reassembly just as you would the bearing areas.
A very tight seal around the crankshaft is achieved with this process, and it does work well. If you're using a later 1098 or any 1275 engine they came with a sealed crankcase ventilation system and a smog valve. You must have an operational PC Valve on these engines. Doesn't have to be the original funky expensive British one, a Japanese one works too and it's a lot less money. Without one, this sealing system won't work because of high crankcase pressures. Remember, the crankcase ideally should have a slight vacuum to it with the engine running, and that's what the PC Valve will do.
-Paul Asgerisson Morriservice