
The dual channel master (or tandem master cylinder as the brits called it) is removed by itself. There is no need to remove the entire pedal box or disconnect the clutch master cylinder to rebuild or replace the tandem master cylinder. Here's the instructions from the factory workshop manual the "tandem" master cylinder.
Section Mb.2MASTER CYLINDER
Removing
- Unscrew the four retaining screws and remove the pedal box cover.
- Disconnect the hydraulic pipes from the master cylinder.
- Withdraw the split pin from the push-rod clevis pin and remove the clevis pin.
- Unscrew the two bolts securing the master cylinder to the pedal box and remove the master cylinder.
Incidentally, the only difference between those instructions and those in section Ma.1 for the single line master cylinder is that in Ma.1 step 2 "pipes" is singular.
The manual does not say what tools to use or show you how to use them. However, if British Leyland says it can be done, then a tool must exist (or have existed) somewhere to do it as described. The question is not if it exists, but wether that tool is in fact a special tool availible only to the BL service department. British Leyland always assumes that its official repair manual will be read only by experienced and well equipped mechanics, and not the average do it yourselfer. They simply lack detail when it comes to things they think should be obvious. I know its possible to remove the master without removing the whole box because some years ago I replaced the master (the rear channel was completely dead) exactly as BL described. You just need the right tools.
To suppliment the information in the manual, I begain exparimenting to see which tool combination worked best for each of the two bolts. This is based on what I have on hand. This is by no means the definitive method. Obviously you need a wrench of some kind on both the bolt and the nut. The upper bolt is removed using a 1/2" crescent wrench and a 1/4" drive ratchet with a 2" extension, a u-joint, and a regular 1/2" socket.
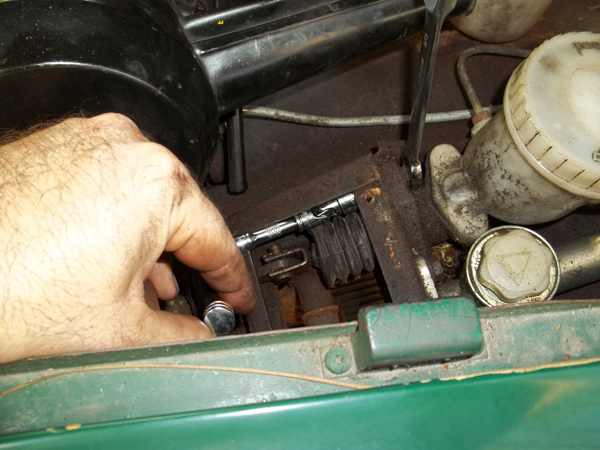
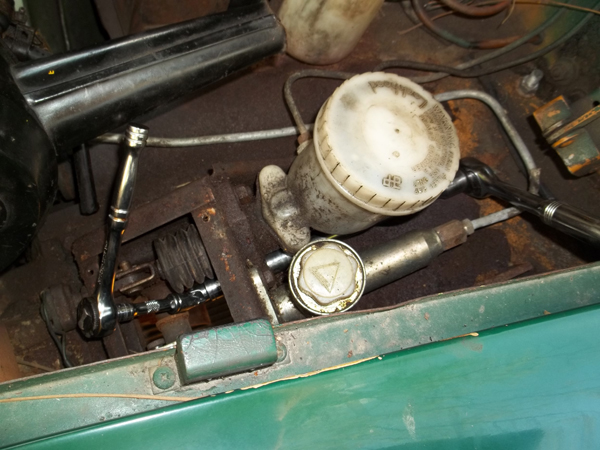
The lower bolt is removed using the same 1/4" drive setup already described, and a 3/8" drive ratchet, 6" extension and a regular 1/2" socket.
Reinstallation will probibly be a bit more challenging but not impossible, just remember to always ALWAYS insert the bolts from the master cylinder side of the pedal box and the nuts from the pedal side of the pedal box. I doubt one could ever get your fingers at the nuts if the bolts go in the wrong direction. But if for some reason you still feel like you have no choice but to remove the pedal box. it should be possible to do without disconnecting the clutch master from the hydraulic line. To do that, you would first need to follow the exact same instructions as in section Mb.2 but skip step 2 and do it to the clutch master instead of the brake master. You would then need to remove the 8 bolts holding the pedal box in place, disconnect the brake light switch, and then simultaniously slide the pedal box forward and teh clutch master rearward until its clear of the pedal box. You would then have to lift the pedal box up and out of the car.